How to Frame and Mount an Otomi Tapestry Without Damaging the Threadwork
Blog
6 min read
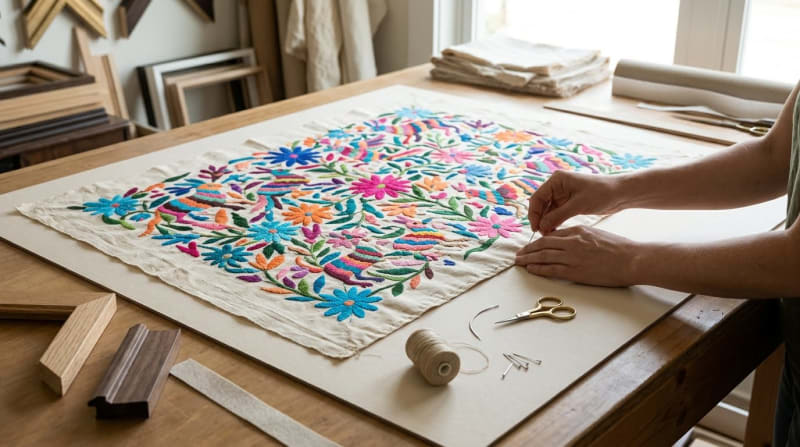
Improper mounting materials like spray adhesives, acidic cardboard, and tight glass can permanently stain raw muslin, tear hand-spun fibers, and crush months of raised needlework. Protecting an authentic piece requires learning how to frame an Otomi tapestry safely by hand-sewing the textile onto acid-free cotton rag board and setting it behind UV-filtering glazing with structural spacers. This non-invasive conservation technique secures the fabric without adhesives, allowing natural fibers to breathe while preserving the delicate relief of traditional Mexican embroidery.
Traditional Otomi textiles, also known as Tenango embroidery, originate from the Otomi-Tepehua region of Hidalgo, Mexico. Artisans draw freehand animal and botanical figures onto unbleached cotton muslin before filling the silhouettes with an intricate, tightly packed blind stitch or closed herringbone stitch. Because the colored embroidery floss floats almost entirely across the front face of the fabric to conserve thread, the surface features a raised, sculptural relief. Displaying Tenango embroidery requires specialized techniques that support the heavy embroidery floss without straining the underlying cotton.
Archival Supplies and Profile Selection
Framing Mexican textile art successfully begins with dedicated conservation materials that will not chemically interact with the unbleached fabric or cotton embroidery floss. Standard retail frames and backing boards contain lignin and acidic wood pulps that leach yellow stains into natural cotton over time.
| Material Component | Standard Ready-Made Frame | Archival Textile Frame |
|---|---|---|
| Mounting Substrate | Corrugated cardboard or MDF board | Acid-free cotton rag mat board |
| Glazing | Basic float glass or cheap plastic | High-grade UV-filtering conservation glass or acrylic |
| Textile Attachment | Spray adhesive, double-sided tape, or staples | Hand-sewn cotton basting or couching stitches |
| Interior Clearance | Textile pressed directly against the glass | Archival acrylic spacers |
| Dust Seal | Masking tape or unsealed frame backing | Acid-free backing board sealed with water-activated linen tape |
Choose between a deep shadowbox or a custom profile with a deep rabbet, which is the inner recess holding the glass and board. Mounting textile art in a shadow box provides generous visual depth and ample room for larger pieces, while a deep-rabbet frame maintains a slimmer profile on the wall. For tools, select curved upholstery needles, blunt tapestry needles, unbleached cotton sewing thread, and clear acrylic frame spacers with archival adhesive strips.
Relaxing Muslin Fabric Without Flattening Satin Stitches
Handmade Otomi textiles arrive folded or rolled, creating prominent creases in the raw muslin ground. Applying a hot, dry household iron directly to the front of the tapestry will permanently flatten the raised cotton stitches, stripping the piece of its signature dimensional appearance.
To safely smooth the fabric, suspend a handheld steamer several inches away from the reverse side of the textile. Allow the steam to penetrate the fibers without soaking the cotton, then smooth the unembroidered margins gently with clean, dry hands. If you prefer to use an iron, place the tapestry face-down on top of a thick, pristine terrycloth towel. Set the iron to a low steam setting and press lightly on the plain muslin back; the plush towel cushions the raised threadwork and prevents the stitches from crushing. Once steamed, lay the tapestry completely flat on a clean table overnight so the cotton fibers acclimate to room humidity and release any remaining tension.
Hand-Stitching the Canvas to Cotton Rag Board
The primary rule of conservation framing is reversibility, meaning any technique applied to the textile must be completely removable without causing fiber loss. Finding genuine pieces in Lanna Ha's wall art catalog means handling heirloom craft that deserves careful preservation. Chemical glues cross-link with cotton fibers over time, causing brittle discoloration and permanent hardening. When a creator on Reddit asked how to remove glue from a print without damage, commenters suggested that the glue may have already damaged the print or recommended dabbing orange essential oil with small cotton swabs while warning that it could stain paper.
Cut a piece of acid-free cotton rag board to the interior dimensions of your frame. Center the relaxed Otomi tapestry onto the board, using clean glass paperweights to keep it steady. Thread a curved needle with archival cotton basting thread that matches the warm tone of the rustic muslin cloth.
Begin hand-stitching along the top margin of the textile, working from the center outward to ensure even tension across the grain line. Use a series of loose couching stitches or discreet whip stitches, catching three to four warp threads of the muslin edge before passing down through the mat board. Space your stitches evenly along the top, bottom, and side borders. Keep your thread tension moderate; pulling too hard creates puckering across the embroidery field, while leaving too much slack allows the heavy cotton floss to sag downward over time.
Creating Structural Breathing Room with Spacers
Embroidered textiles should never touch frame glazing. Trapping raw cotton against glass creates microclimates where condensation can form, encouraging mildew spores and causing colored dyes to transfer to the glass pane. Static electricity from acrylic glazing can also pull loose embroidery threads outward, distorting the motifs.
Addressing this issue requires leaving adequate headspace within the frame enclosure. When a user on Reddit asked what size shadow box or frame to get for a script, a commenter suggested using a mat border to allow a recess made of acid-free foam board and potentially using two mats to prevent fasteners from touching and scratching the glass. Clear acrylic spacers achieve this separation cleanly. Cut the spacers to match the interior dimensions of the frame walls, peel the protective liner, and press them firmly against the inside lip of the frame rabbet, directly beneath the glass. The spacers hold the glazing away from the textile, giving the raised animal and floral stitches plenty of breathing room.
Sealing the Enclosure with Conservation Glazing
Artisanal tapestries often feature vibrant thread palettes dyed with sensitive pigments. A project documented by Google Arts & Culture celebrating Mexican textile traditions illustrates how artisan communities preserve generations of intricate embroidery and weaving techniques across regions like Quintana Roo and Veracruz. Collectors often appreciate the deep cultural roots of these textiles; we discuss this tradition further in our guide to Mexican Otomi embroidery.
Standard picture frame glass blocks less than half of incoming ultraviolet light, which can bleach rich yellows, deep blacks, and magenta threads within a few years of sun exposure. Install conservation-grade acrylic or glass specifically designed to filter out ambient ultraviolet rays.
Once your glazing, spacers, and mounted tapestry are placed inside the frame, install an acid-free barrier board directly behind the cotton mat board. Fasten the stack securely with framing points driven into the wooden molding. Finish the installation by applying acid-free paper tape across the perimeter joint between the backing board and the wooden frame. This breathable seal blocks dust mites, insects, and fine airborne debris without trapping excess indoor humidity.
Evaluating Elevation and Structural Tension Under Raking Light
Before hanging your Otomi embroidery wall art, conduct a thorough structural inspection in a bright room. Stand the frame vertically on a flat table and tilt it gently forward by fifteen degrees. Watch the center of the tapestry closely; if the unembroidered muslin sags away from the backing board, you need to add several internal tacking stitches through the background fabric to distribute the weight across the center.
Position a directional lamp to one side of the frame so that the beam sweeps across the front surface at a low angle. This raking light reveals surface contours clearly. Check that the signature satin stitches sit proud of the base cloth and remain entirely free of compression against the glass. Once you confirm a uniform, contact-free clearance across every motif, the tapestry is ready to hang securely out of direct sunlight, preserving its artisan detail for decades to come.

